Palmetto / Lightreach — Portal Walkthrough
This is the full step-by-step for filling out a Palmetto / Lightreach lease account in the home, from creating a new account to sending the contract.
What we’re building
Section titled “What we’re building”By the time you leave the home, three things need to be true on the Palmetto account:
- Identity — verified
- Title — verified
- Contract — sent (and ideally signed by the homeowner before you walk out)
The full Notice to Proceed turns green when those plus the homeowner-side checklist are done. That’s your signal you’re free to leave.
1. Start from the Accounts list
Section titled “1. Start from the Accounts list”The Accounts list is your home base. Every deal you’ve created lives here, grouped by funnel stage: Qualification → Notice to Proceed → Install.
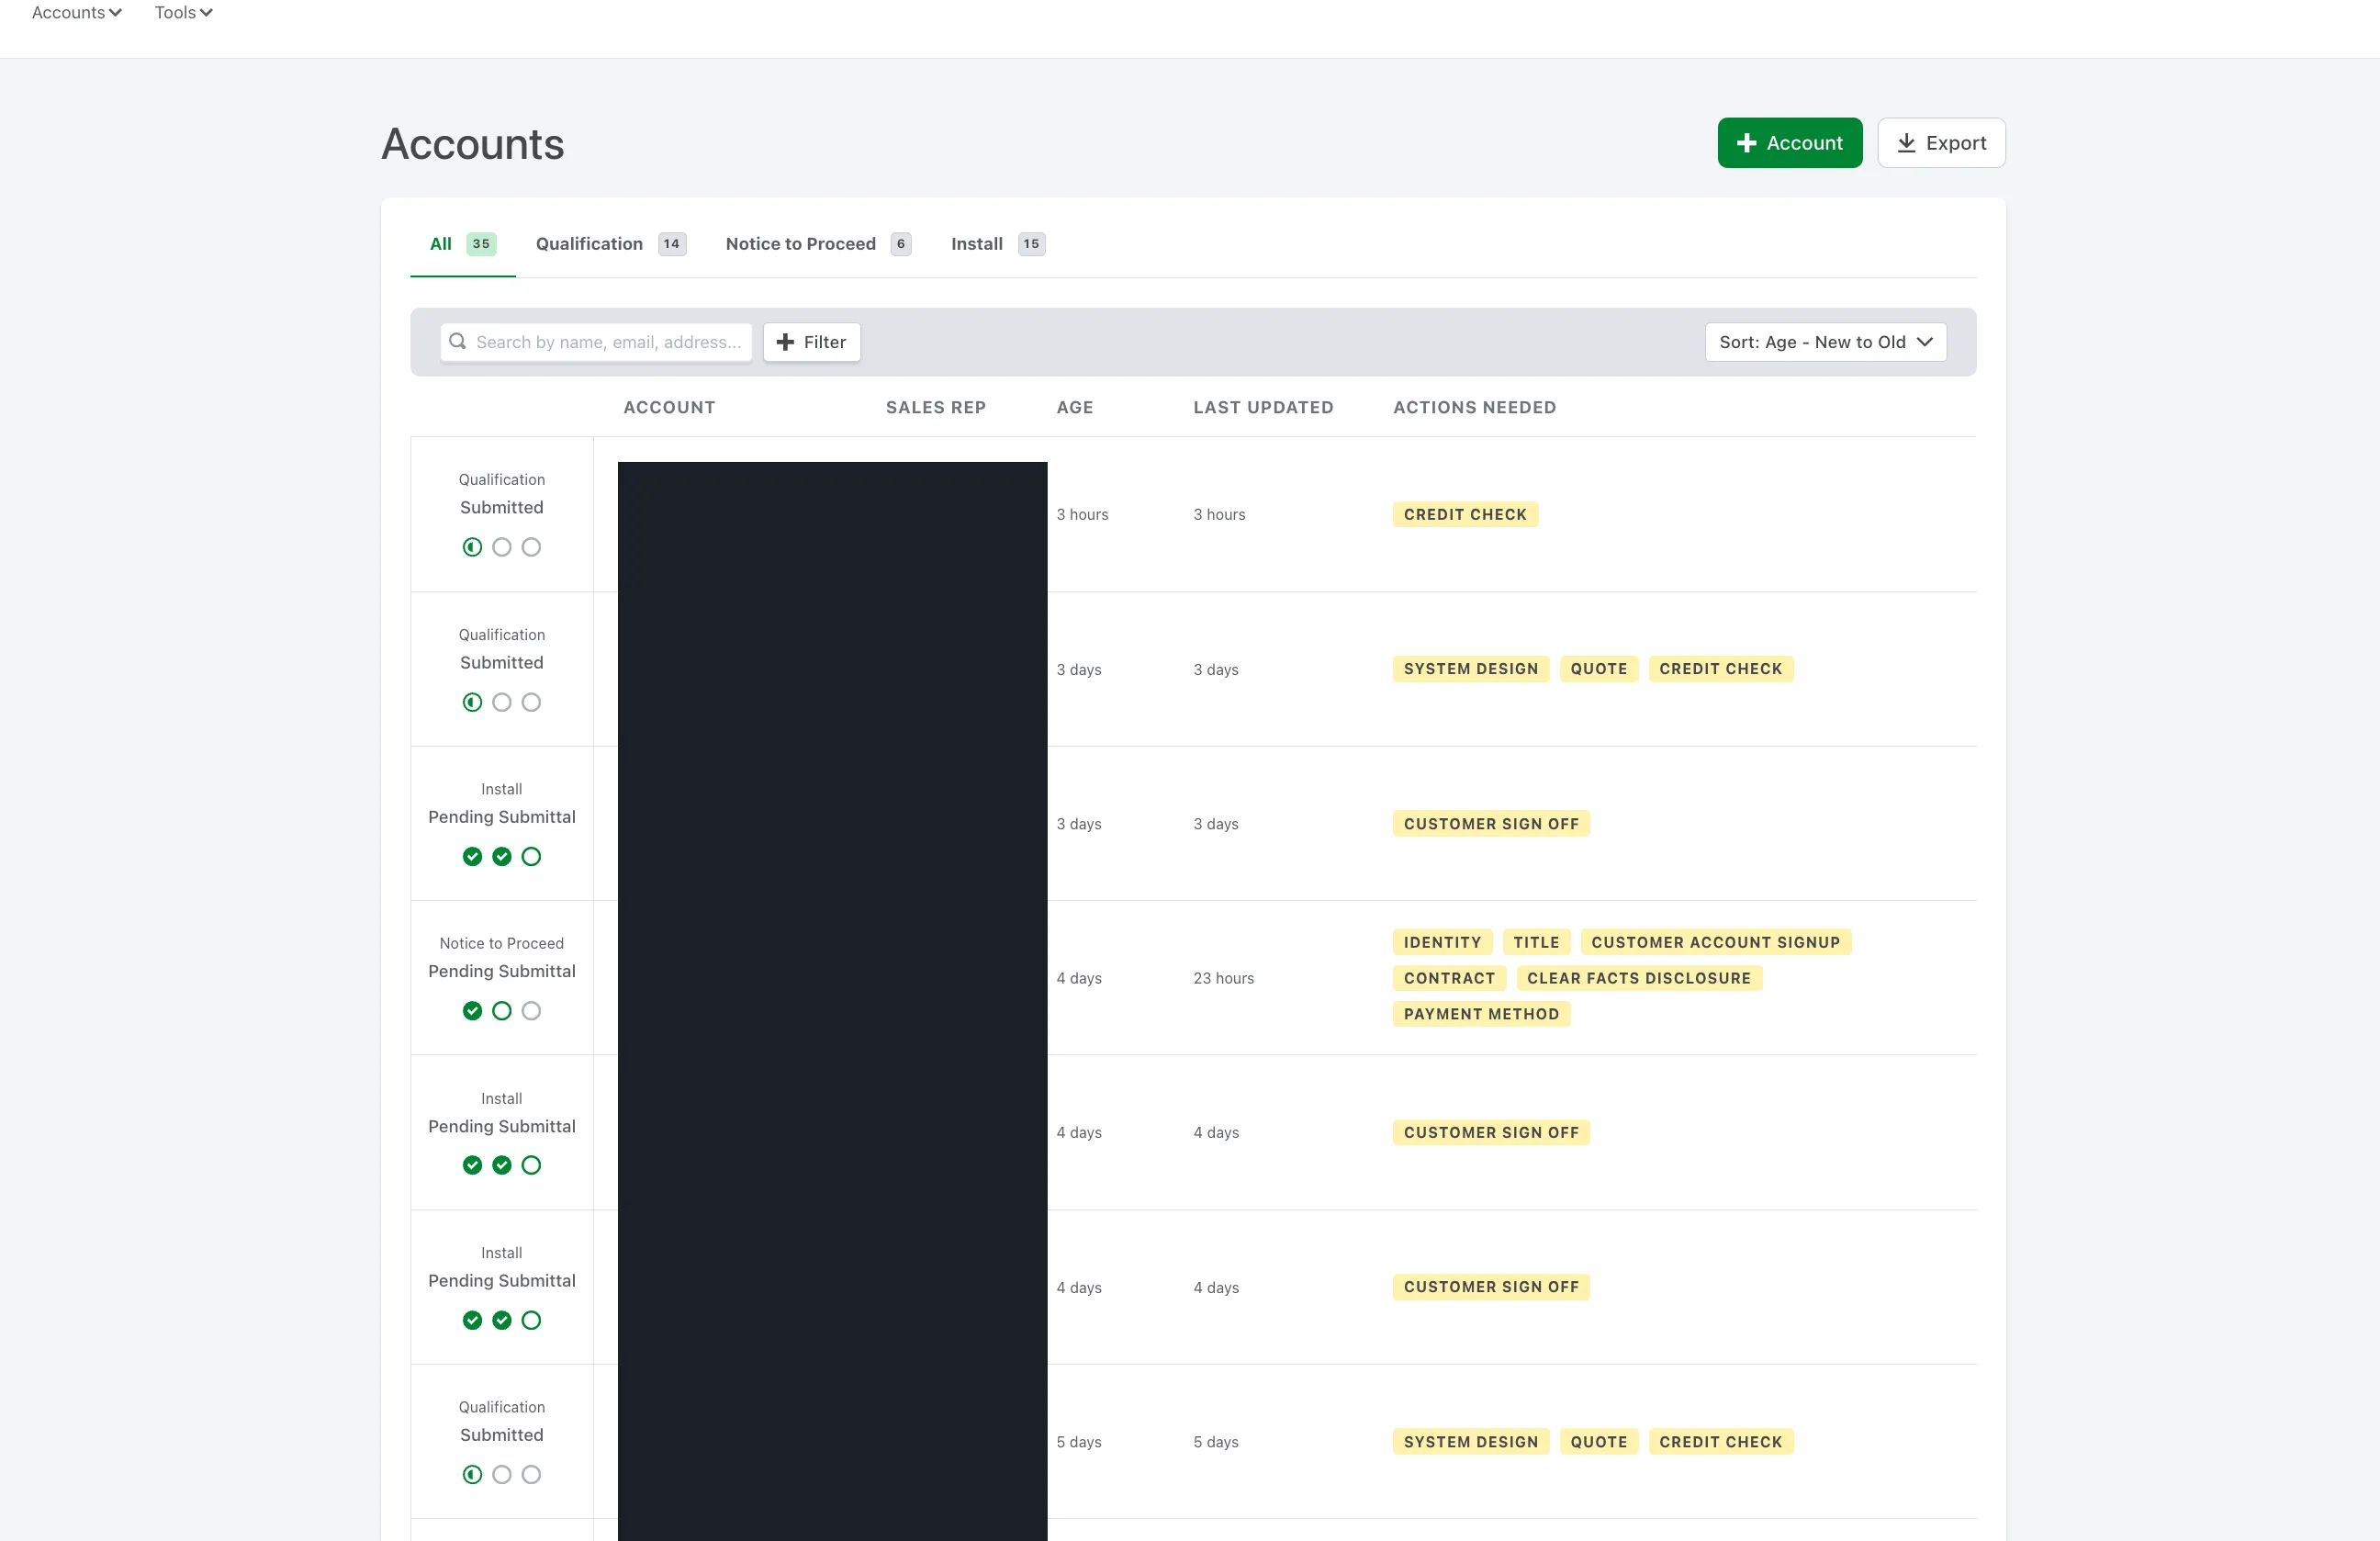
Click + Account in the top right to start a new one.
2. Create the account
Section titled “2. Create the account”The new-account form has four blocks: Account, Property Address, Applicant, and Sales Representative + Property Details at the bottom.
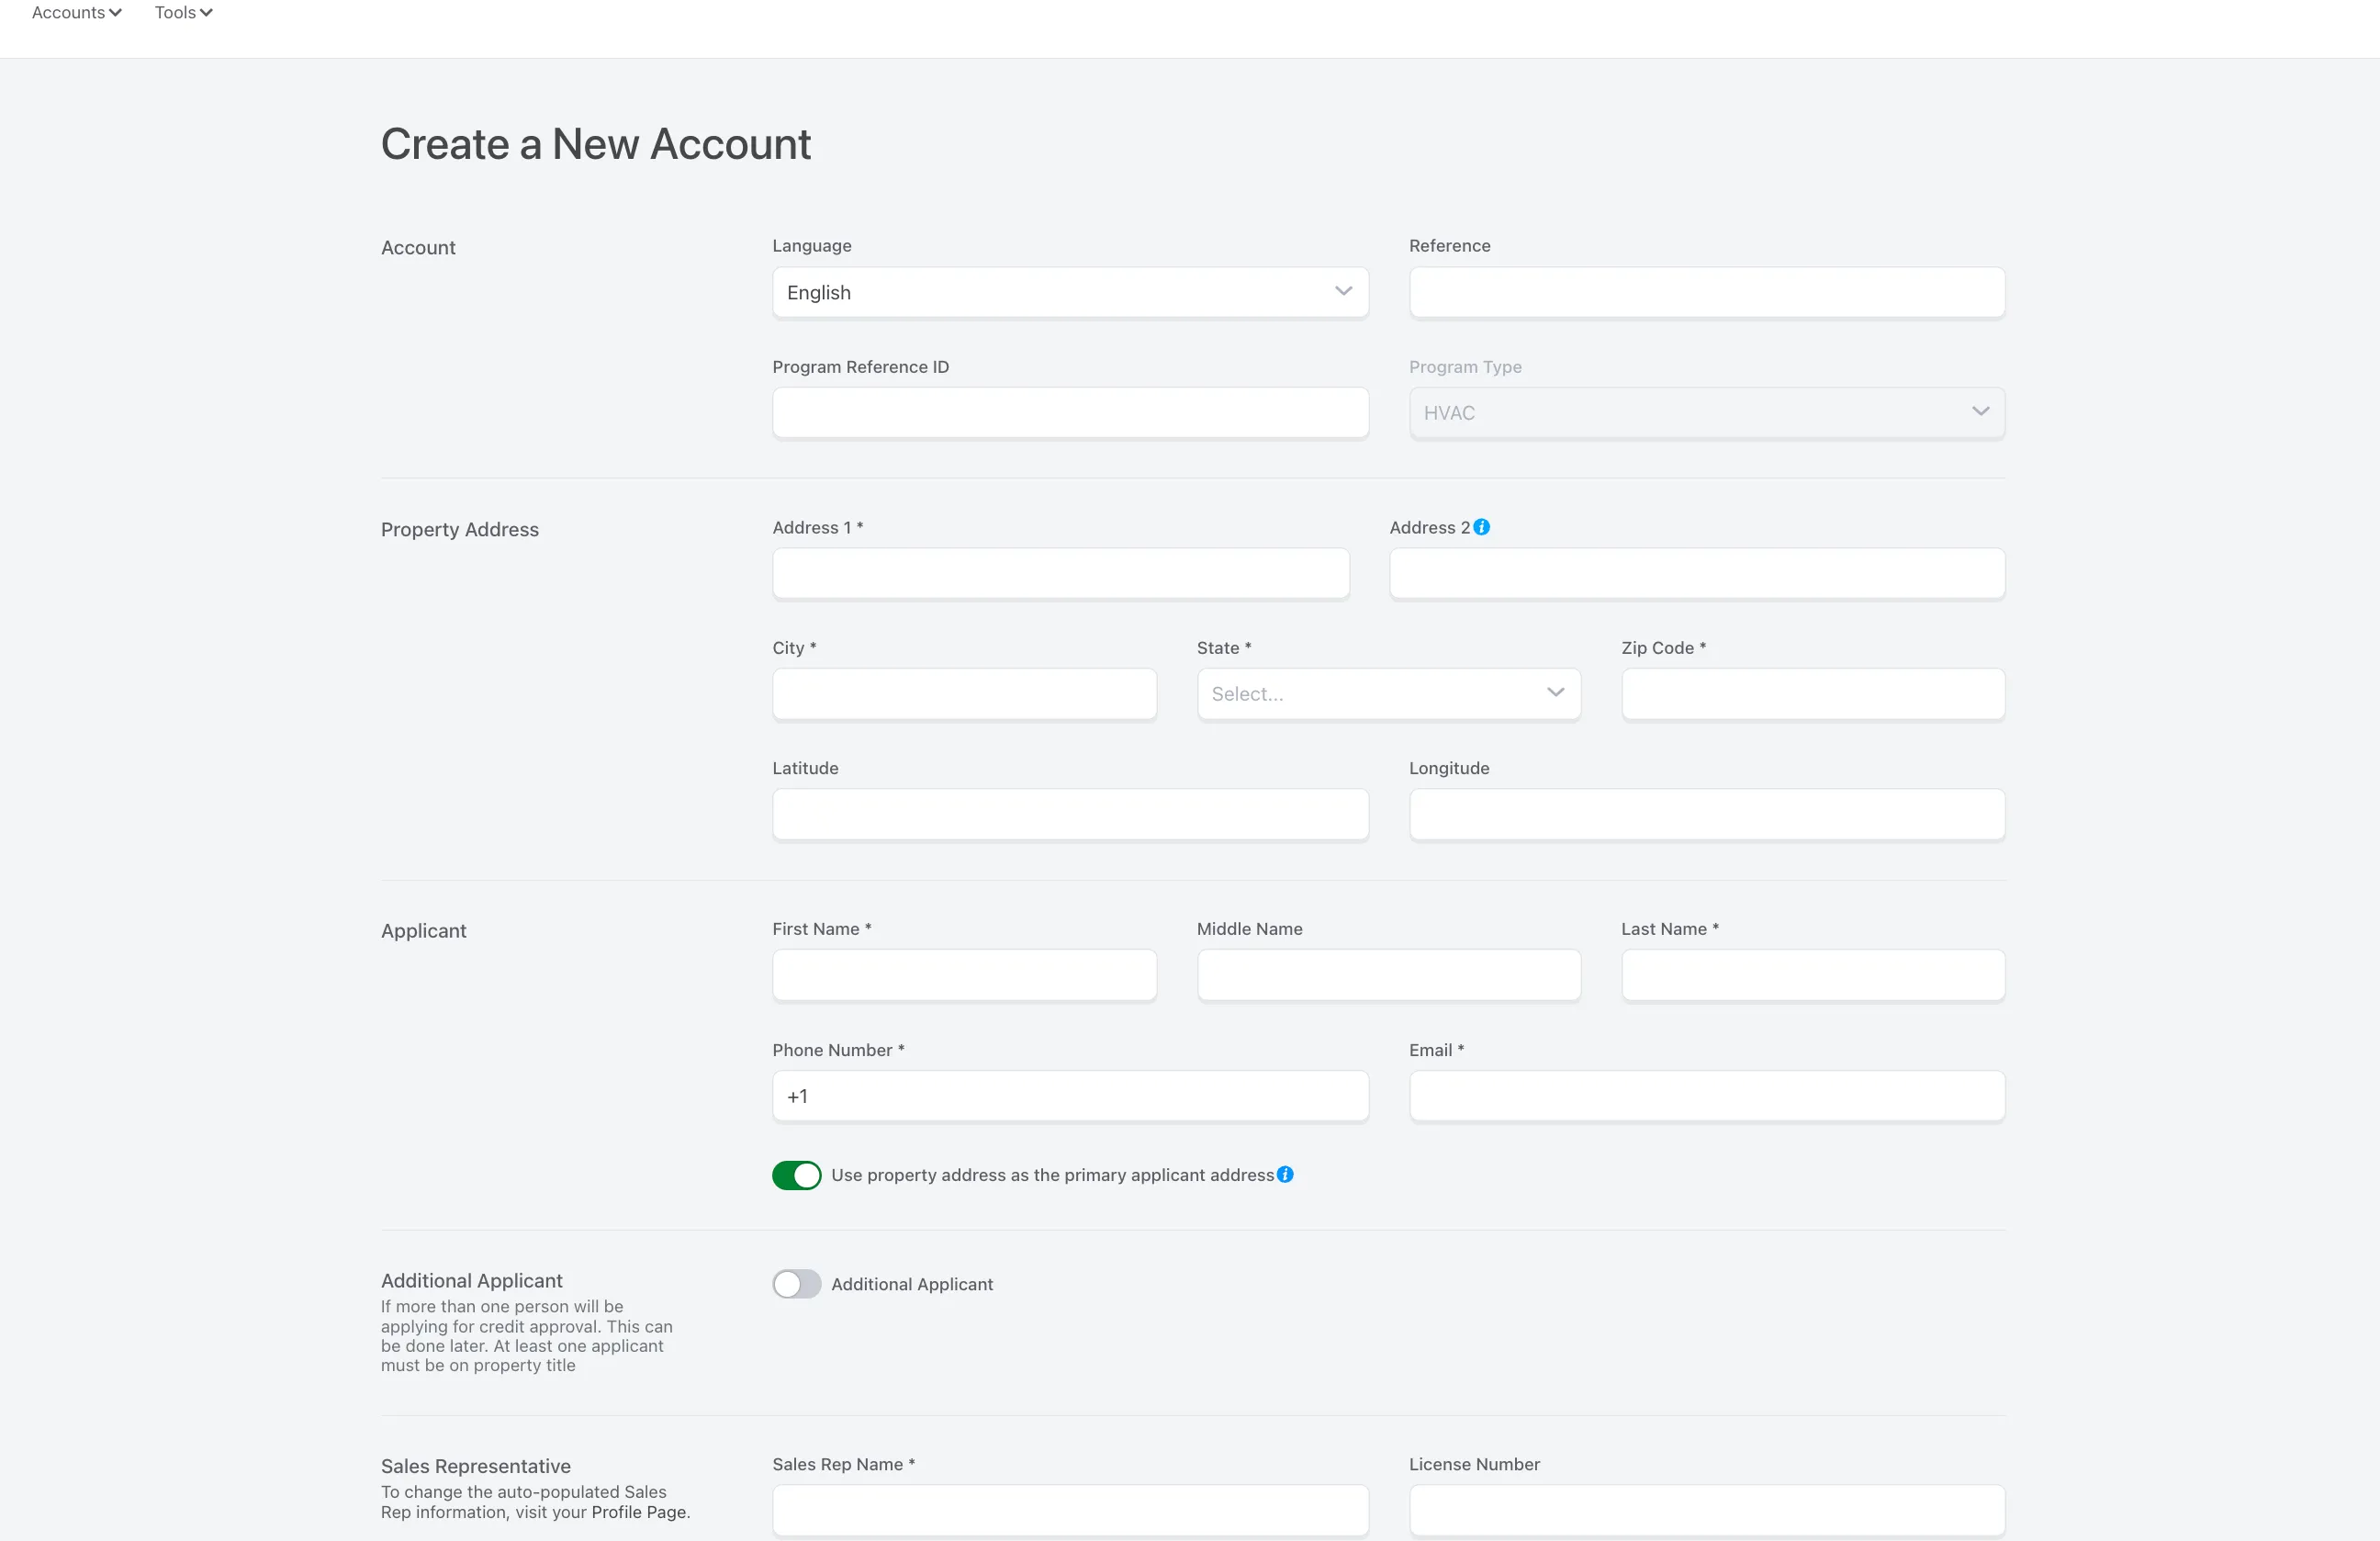
Fill out the property address. If the applicant lives at the property, leave “Use property address as the primary applicant address” toggled on.
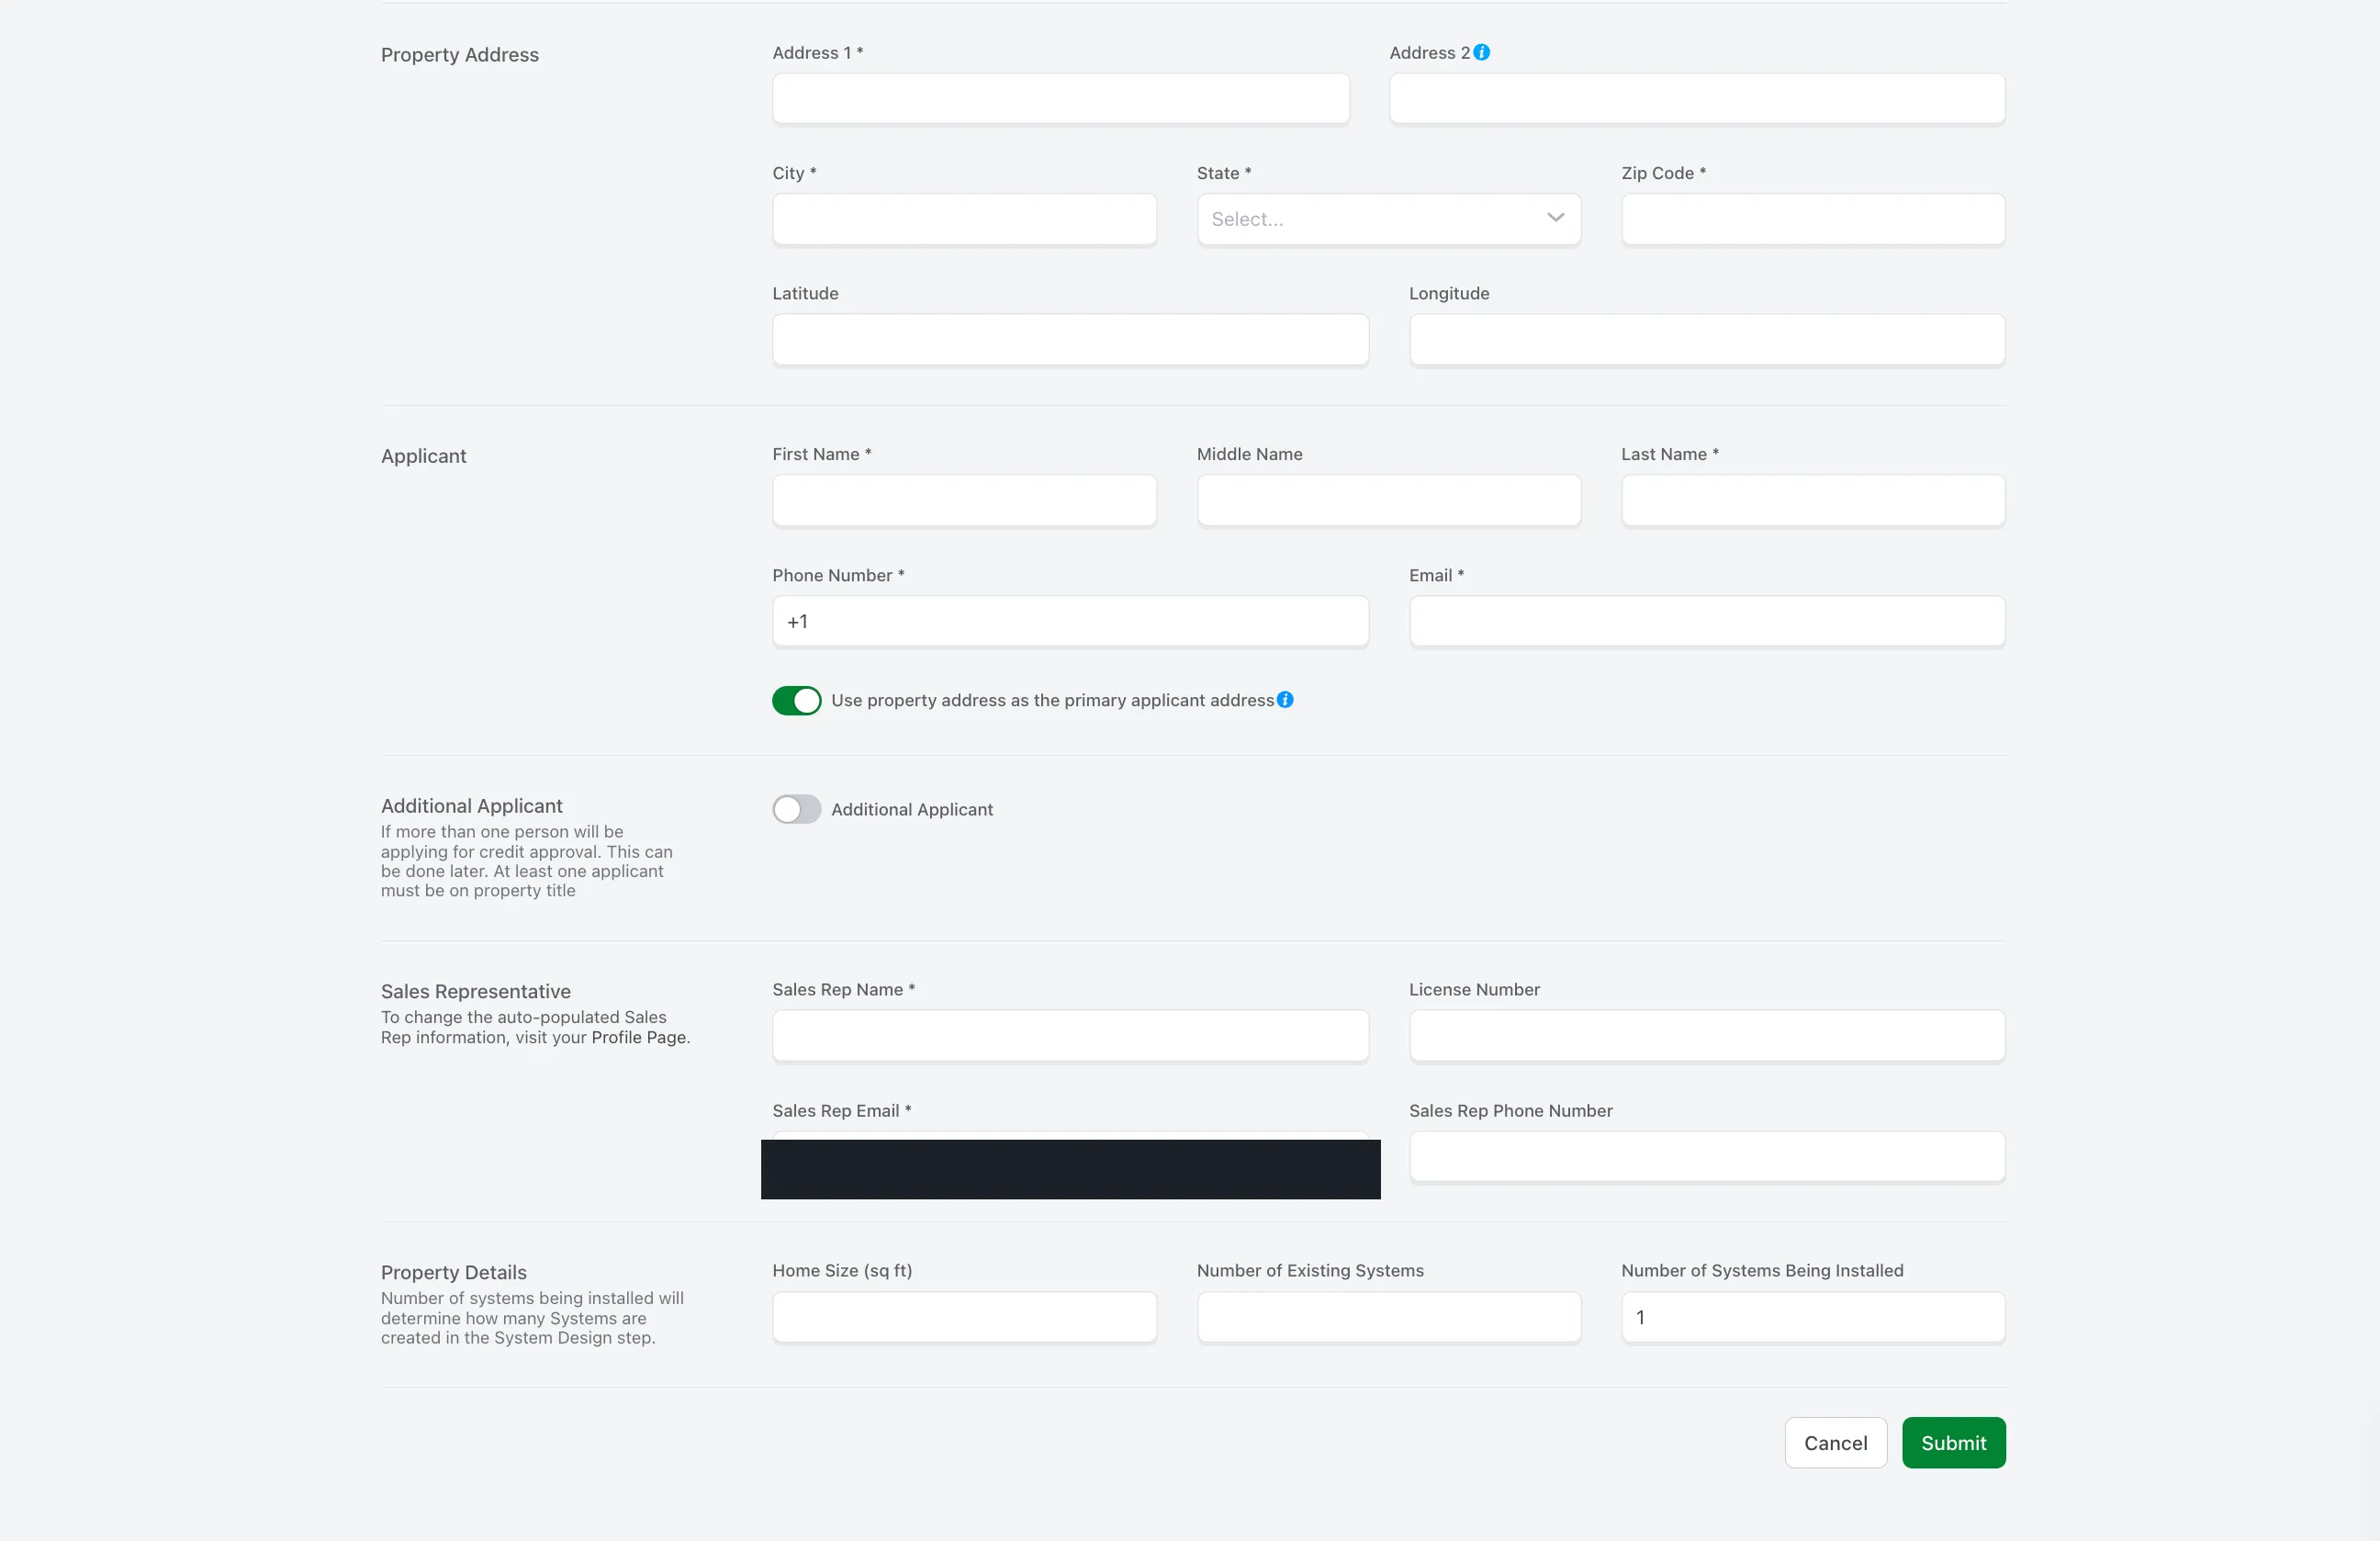
Property Details — the field that trips reps up
Section titled “Property Details — the field that trips reps up”The bottom Property Details block has three numbers:
| Field | What to enter |
|---|---|
| Home Size (sq ft) | Estimated square footage of the home |
| Number of Existing Systems | Almost always 0. This means existing HVAC systems. ~99% of jobs don’t have one. |
| Number of Systems Being Installed | Number of condensers, not number of heads |
Optional: add an additional applicant (co-signer)
Section titled “Optional: add an additional applicant (co-signer)”Toggle Additional Applicant if anyone is co-signing. The big advantage of Palmetto vs other financing:
Hit Submit to create the account.
3. Run credit
Section titled “3. Run credit”The next page asks for the applicant’s:
- Date of birth
- Last 4 of SSN
- Terms & Conditions checkbox
Check the box, hit Run Credit.
You’ll get back Approved or Declined. Approval is usually instant.
4. Identity verification
Section titled “4. Identity verification”Once approved, the Notice to Proceed checklist appears. The first item is Identity Verification.
- Click Upload Proof
- Choose files — front and back of the applicant’s ID
- Upload
That’s it. Identity usually verifies fast.
5. Title verification
Section titled “5. Title verification”The next item is Title Verification. Palmetto runs this against public property records.
- Click Auto Verify
- It pings the property data sources (GLIDE Regrid, First American Data Tree)
- Returns Verified if the applicant is on the deed
Watch out: title fails when the applicant isn’t on the deed
Section titled “Watch out: title fails when the applicant isn’t on the deed”This is the most common stumble after a successful credit check. Palmetto will tell you exactly why:
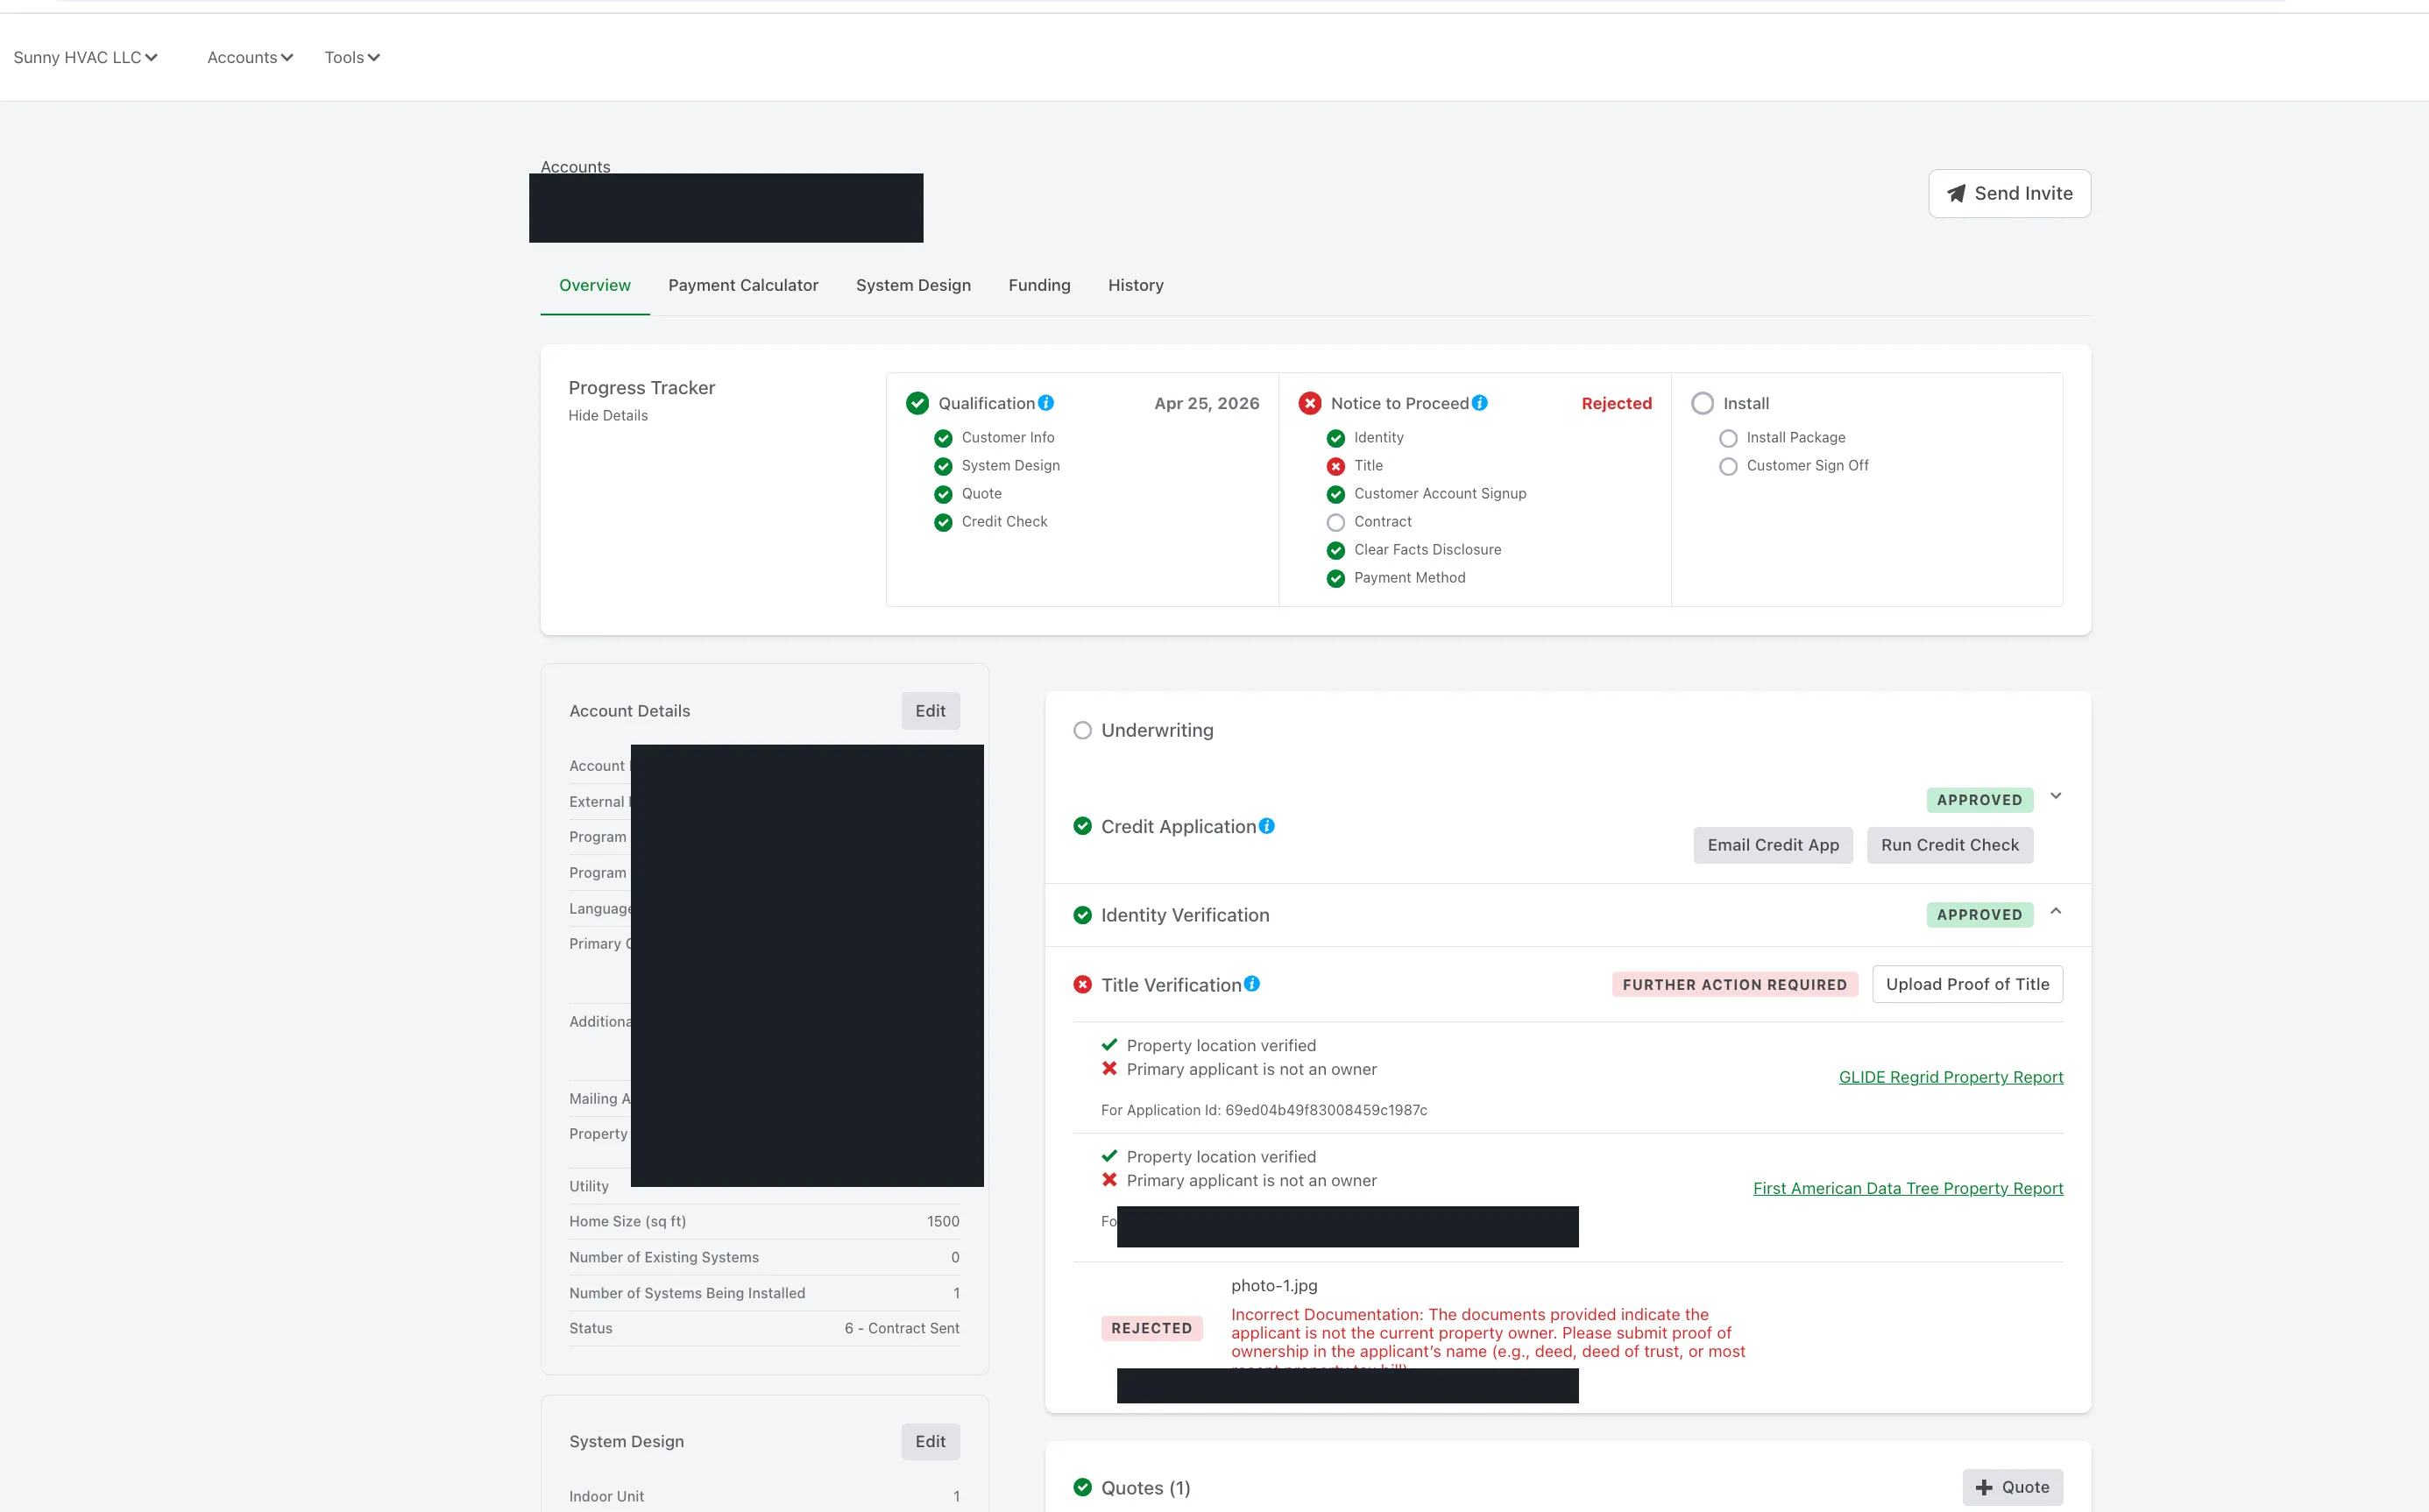
How to fix it:
- Add an additional applicant who IS on the deed
- Or upload Proof of Title (deed, deed of trust, or most recent property tax bill in the applicant’s name)
6. System Design — the most complex step
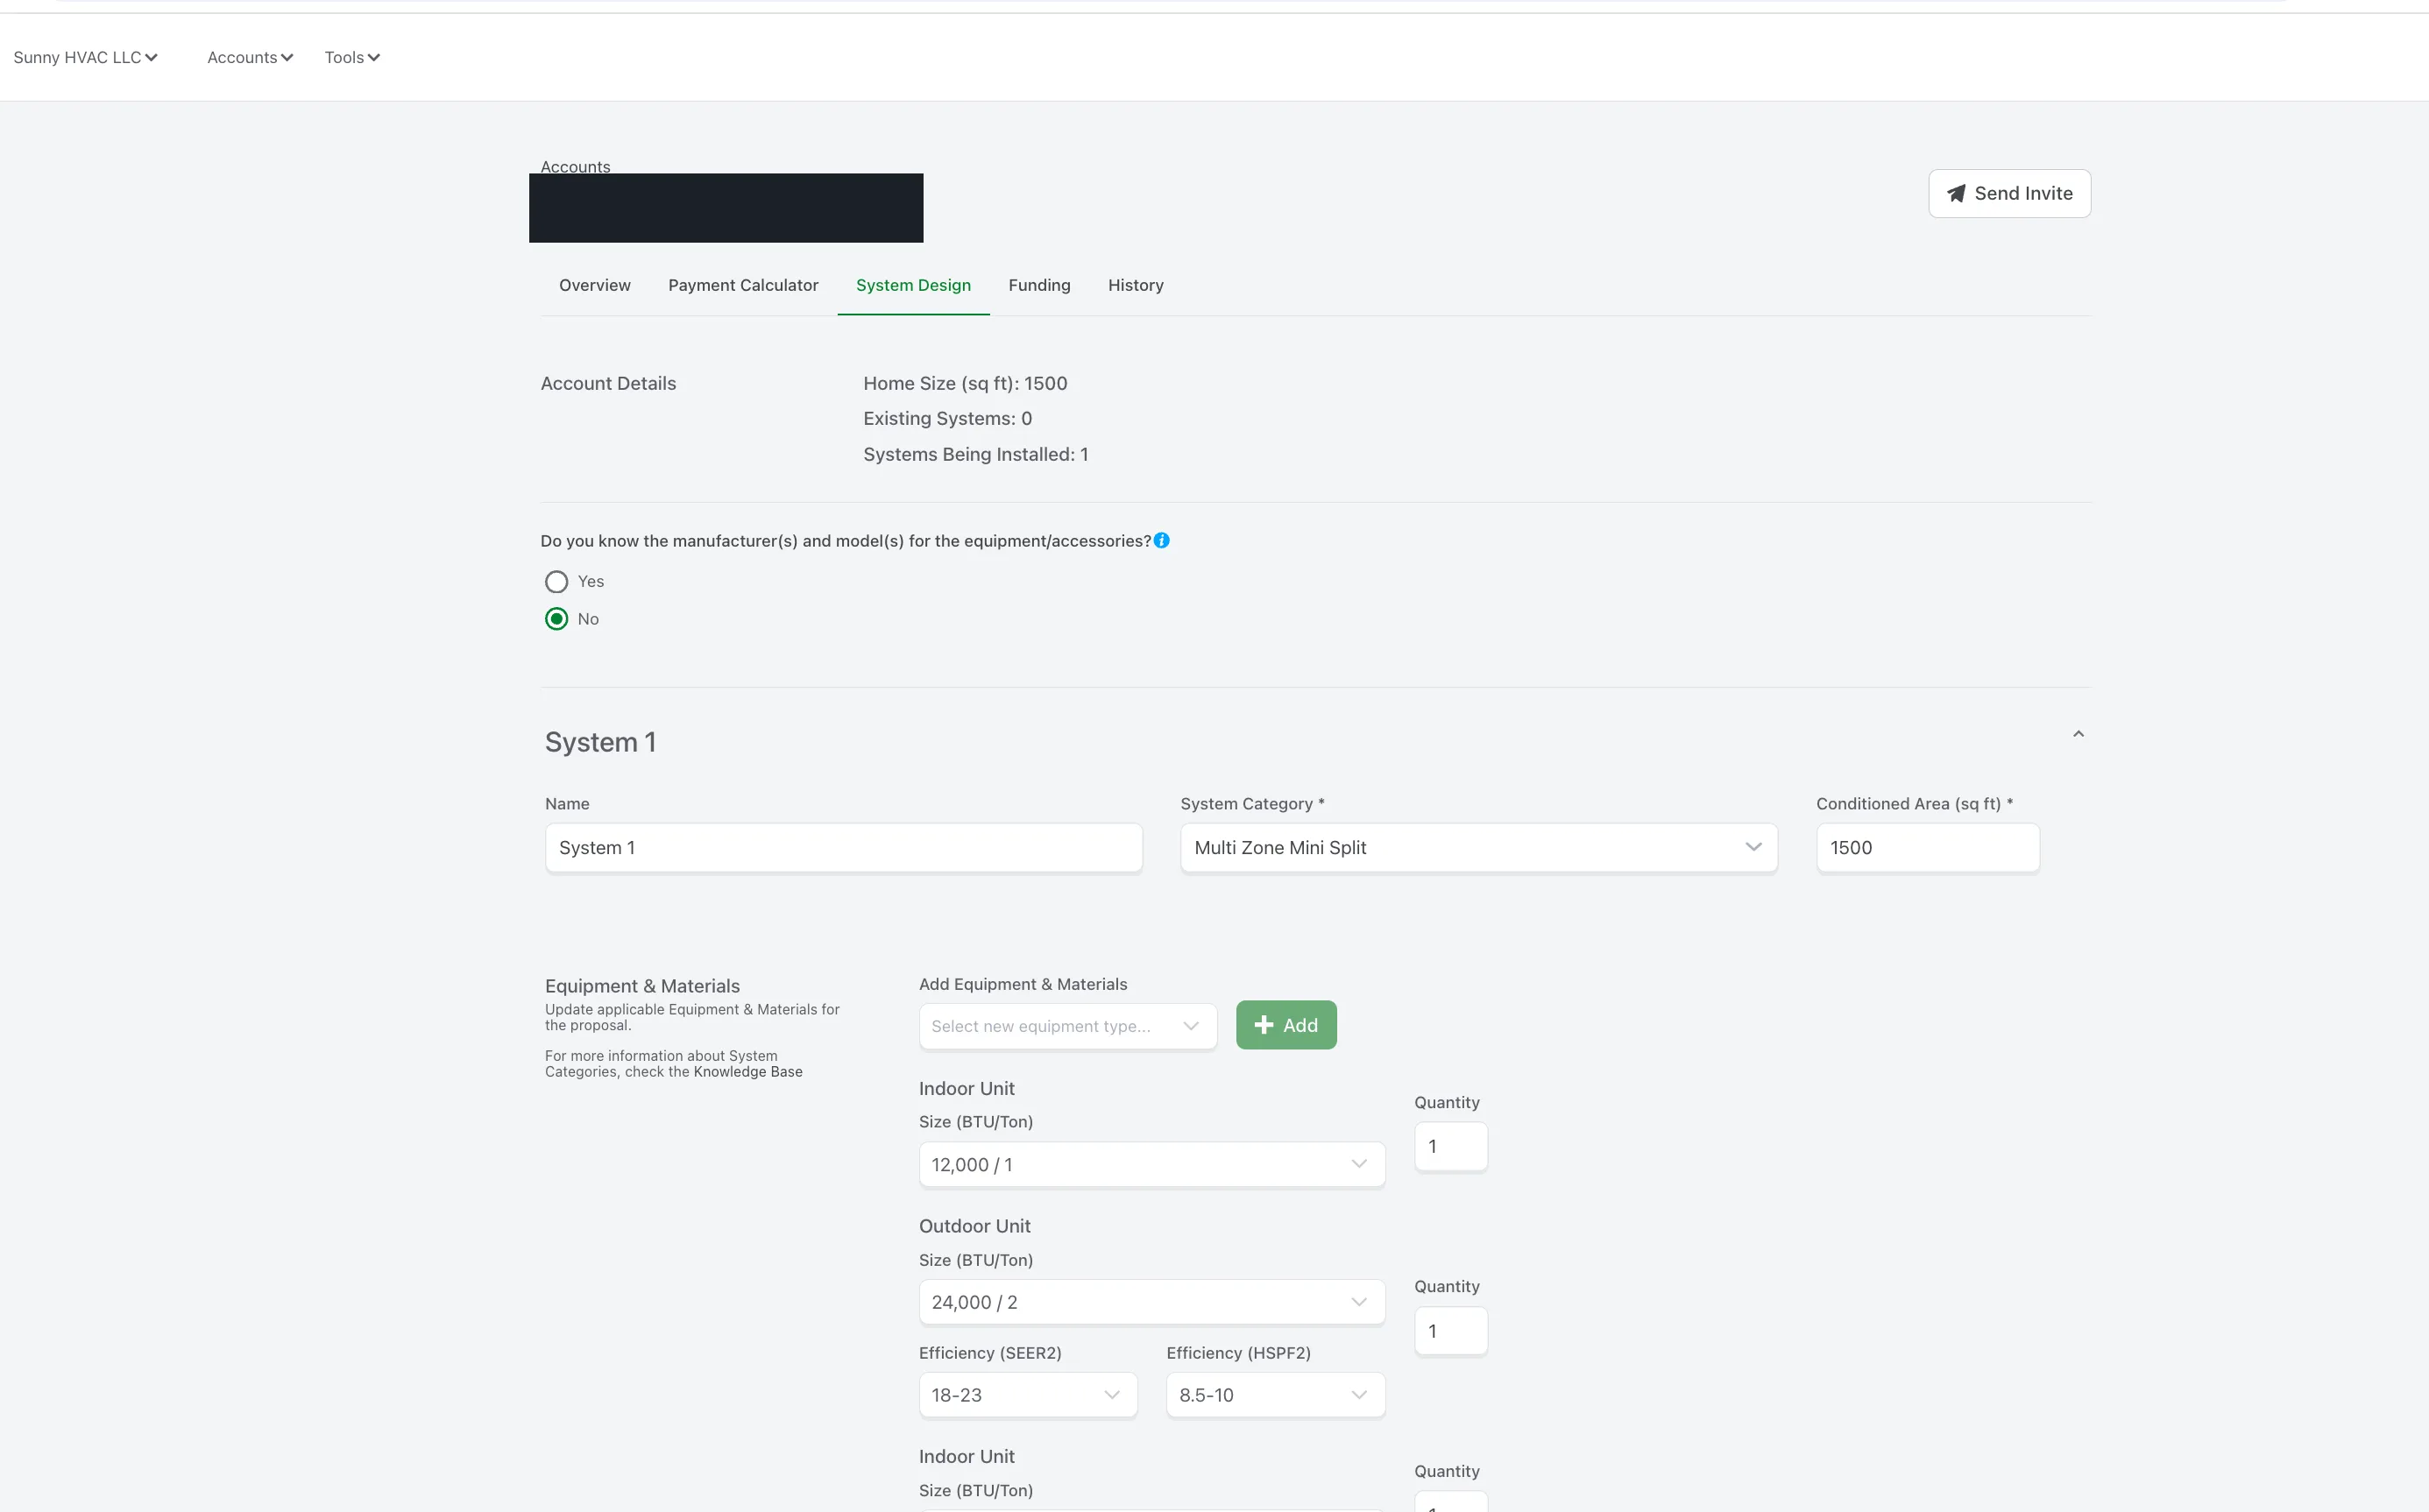
Section titled “6. System Design — the most complex step”Open the System Design tab.
First question: “Do you know the manufacturer and model?”
Section titled “First question: “Do you know the manufacturer and model?””Always pick No. Manufacturer/model is something the install team handles after the survey — you don’t need to commit to it in the home.
Build each system
Section titled “Build each system”Remember that “system” = “condenser.” You’ll add one block per condenser.
For each system, fill in:
| Field | What to put |
|---|---|
| Name | Something useful — e.g., “First Floor”, “Main Floor”, “Upstairs”, “Basement” |
| System Category | Multi Zone Mini Split for most jobs. Air Conditioning or Air Handler for central air |
| Conditioned Area (sq ft) | Estimate is fine. If the home is 2,100 sq ft and the first floor is half, put 1,000 |
Then add the units:
- Indoor Unit → click Add → pick the BTU/Ton size and quantity (one Add per indoor head, or set the quantity)
- Outdoor Unit → click Add → pick the BTU/Ton size of the condenser
- Efficiency (SEER2):
18-23works as a default - Efficiency (HSPF2):
8.5-10works as a default
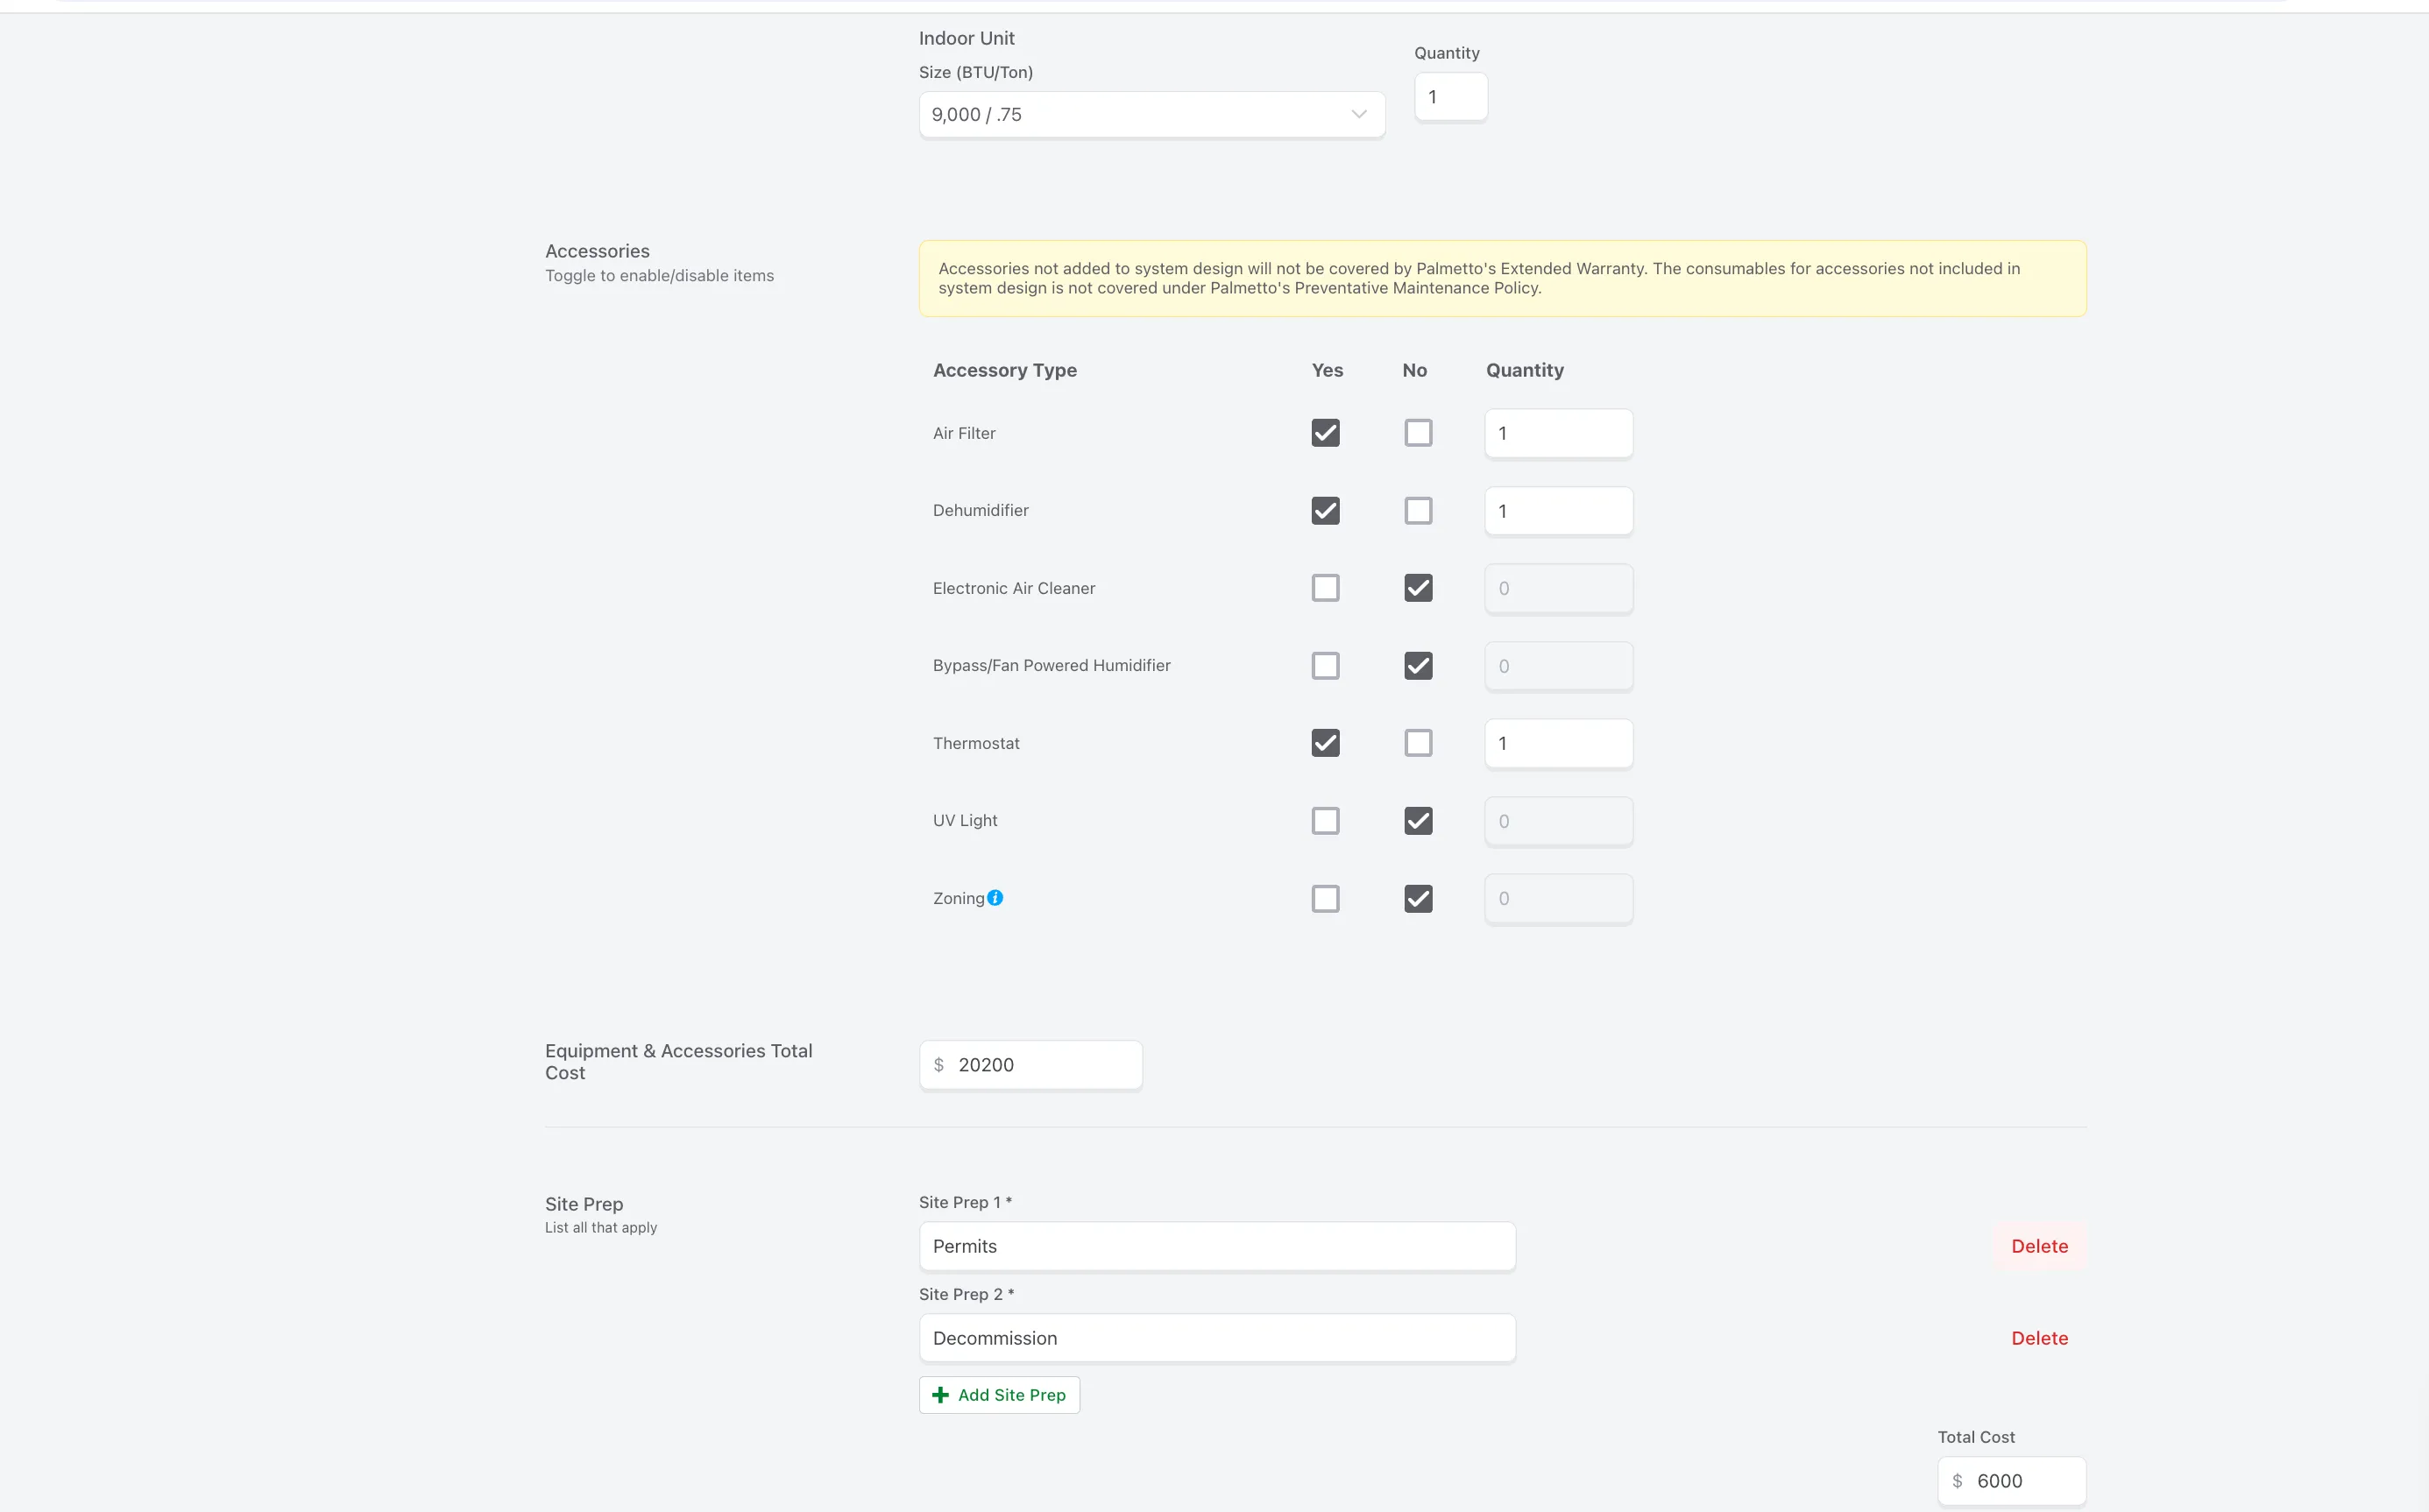
Accessories — mark them all “No”
Section titled “Accessories — mark them all “No””After units, you’ll see an Accessories section: Air Filter, Dehumidifier, Electronic Air Cleaner, Bypass/Fan Powered Humidifier, Thermostat, UV Light, Zoning.
Add every system before pricing
Section titled “Add every system before pricing”Repeat the System block for every condenser. Three condensers = three system blocks.
7. Pricing math — the #1 rep mistake
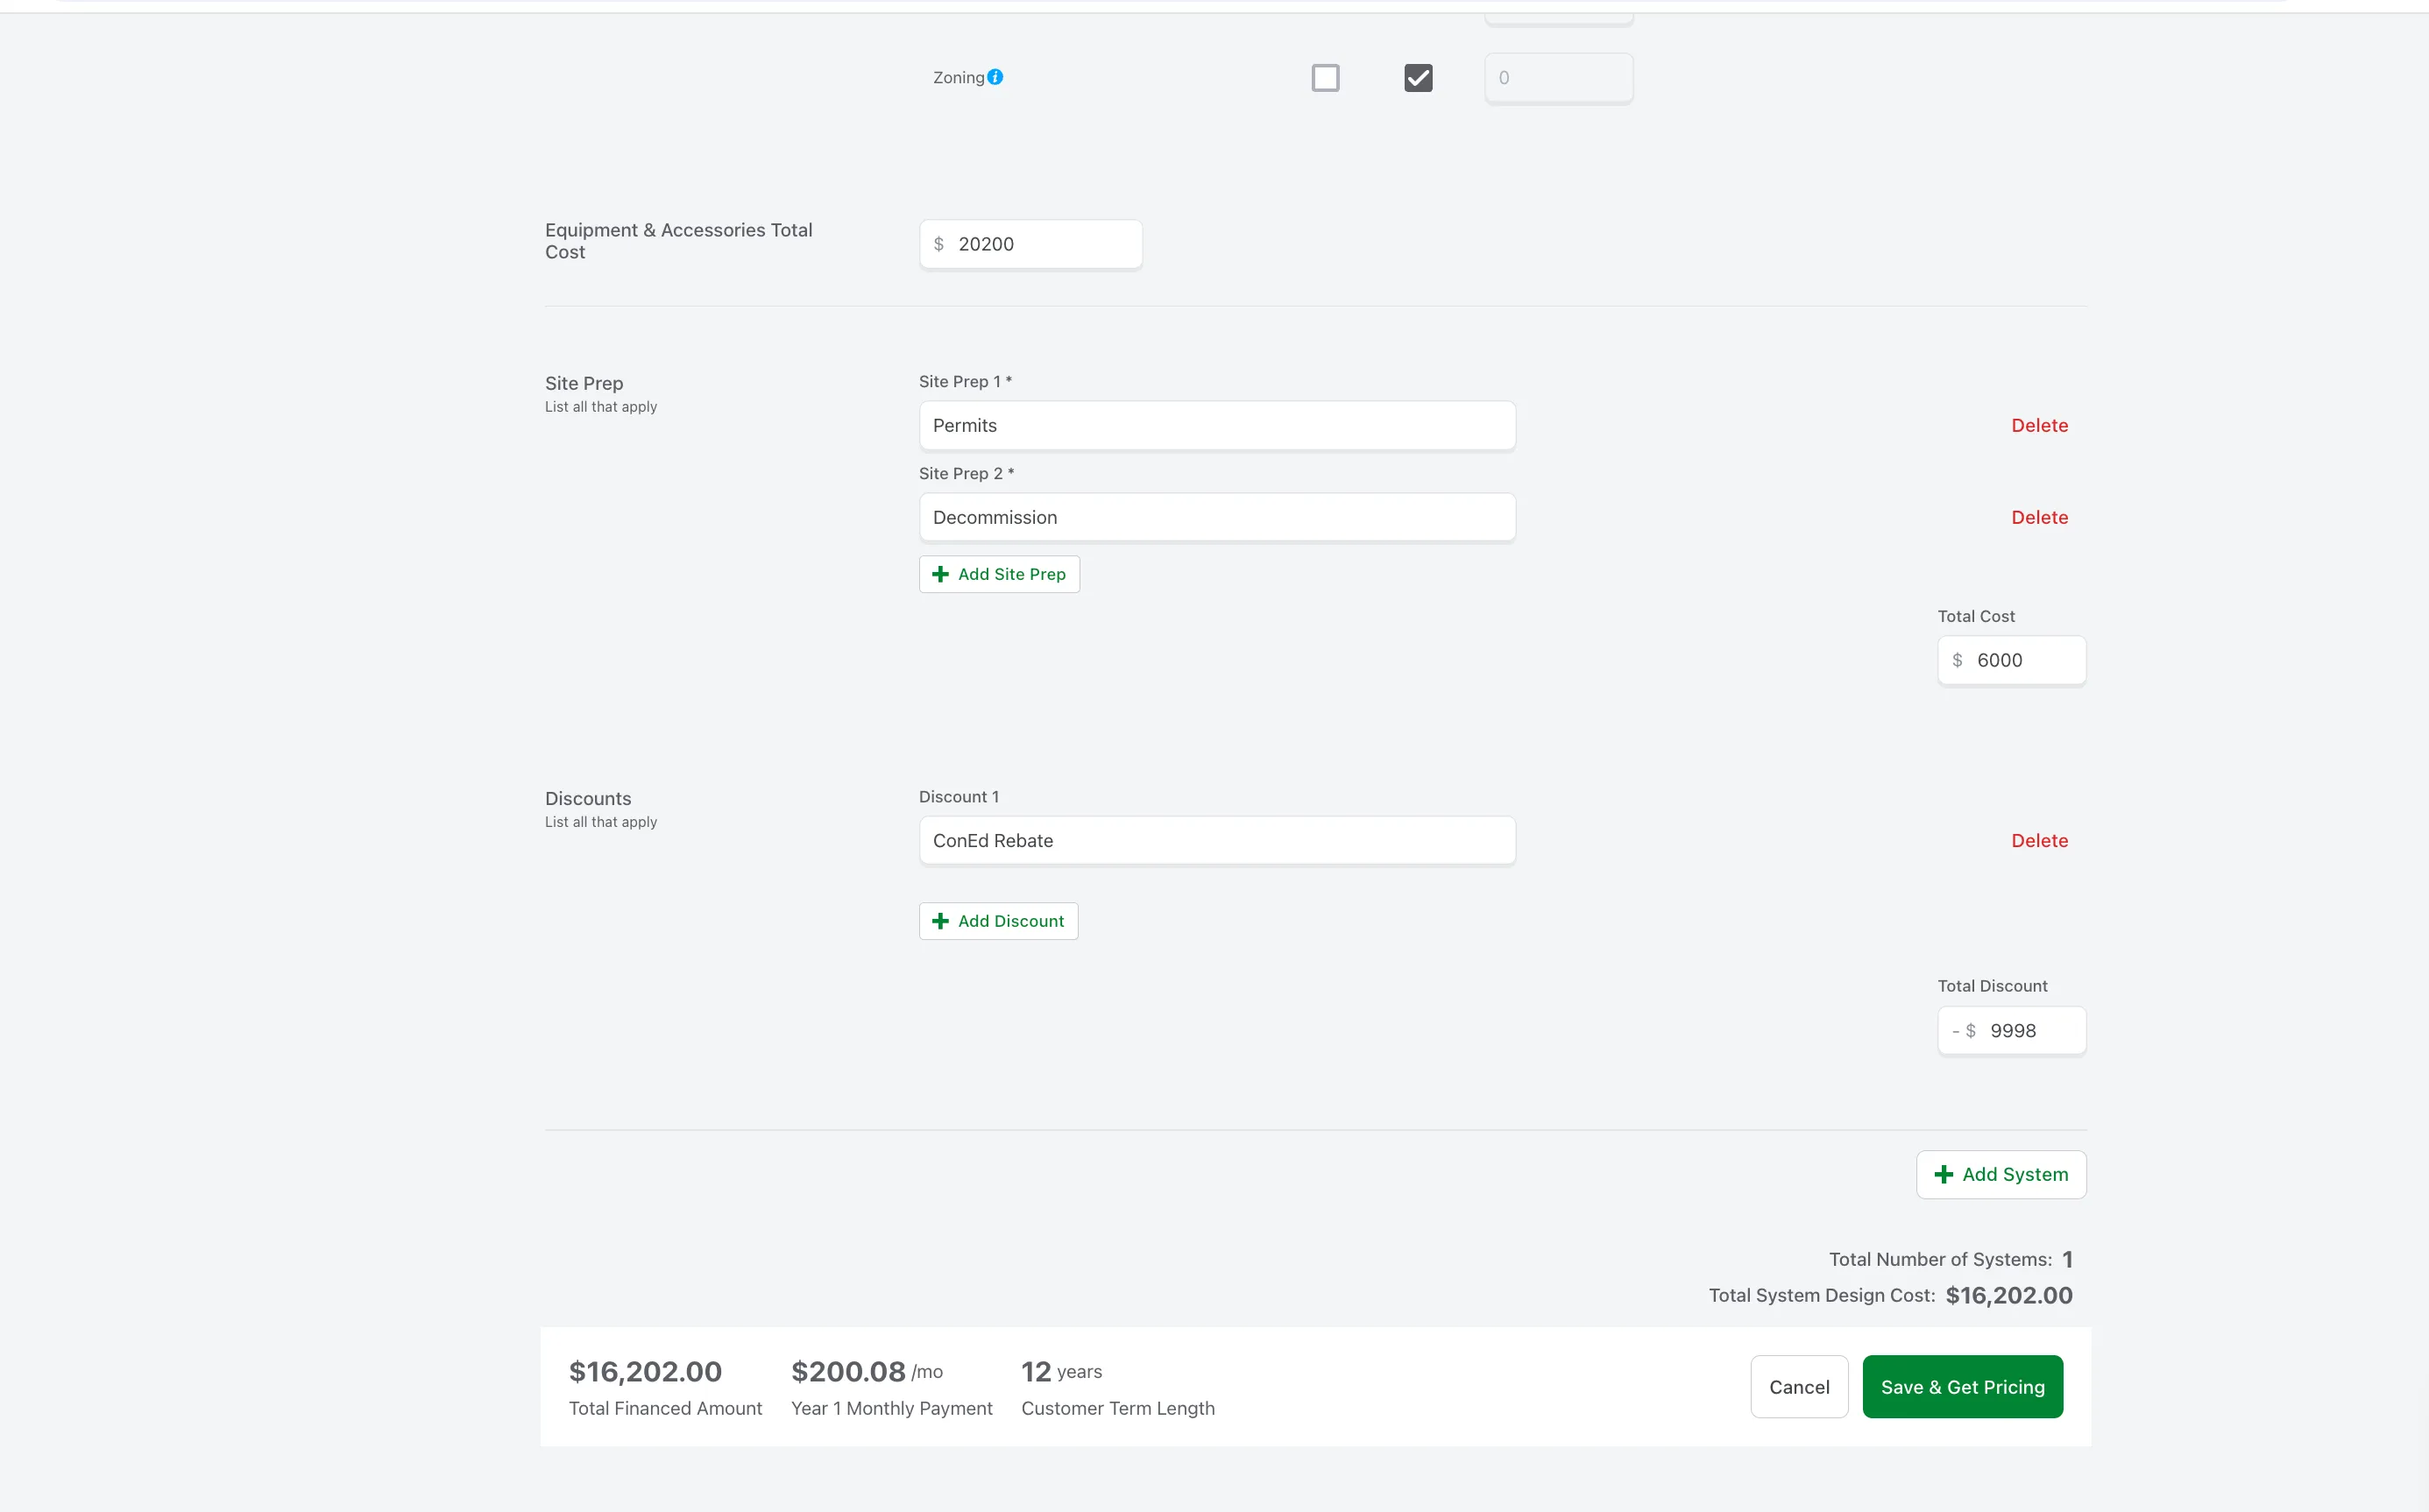
Section titled “7. Pricing math — the #1 rep mistake”Once every system is built, scroll to the bottom: Equipment & Accessories Total Cost, Site Prep, and Discounts.
How to allocate the equipment cost
Section titled “How to allocate the equipment cost”Palmetto isn’t picky about the per-system breakdown — only the total matters. So:
- If your three systems are roughly the same size, divide the total evenly
- If one system is way smaller than the others (e.g., one head vs. five heads), shade it lower so the math looks plausible
- The rule: the total before rebate must match the total project cost you sold
Add the rebate as a Discount
Section titled “Add the rebate as a Discount”If the deal includes a Con Edison Clean Heat rebate (most decommissioning jobs do):
- Scroll to Discounts → click Add Discount
- Name it Clean Heat (or ConEd Rebate)
- Enter the dollar amount (e.g.,
$8,000)
The Total Financed Amount at the bottom updates immediately. That’s the number Palmetto actually finances.
Site Prep
Section titled “Site Prep”Add line items for any one-off costs that aren’t equipment — typical examples are Permits and Decommission (for decommissioning jobs).
8. Pick the term and escalator
Section titled “8. Pick the term and escalator”Click Save & Get Pricing at the bottom, or open the Payment Calculator tab. You’ll see:
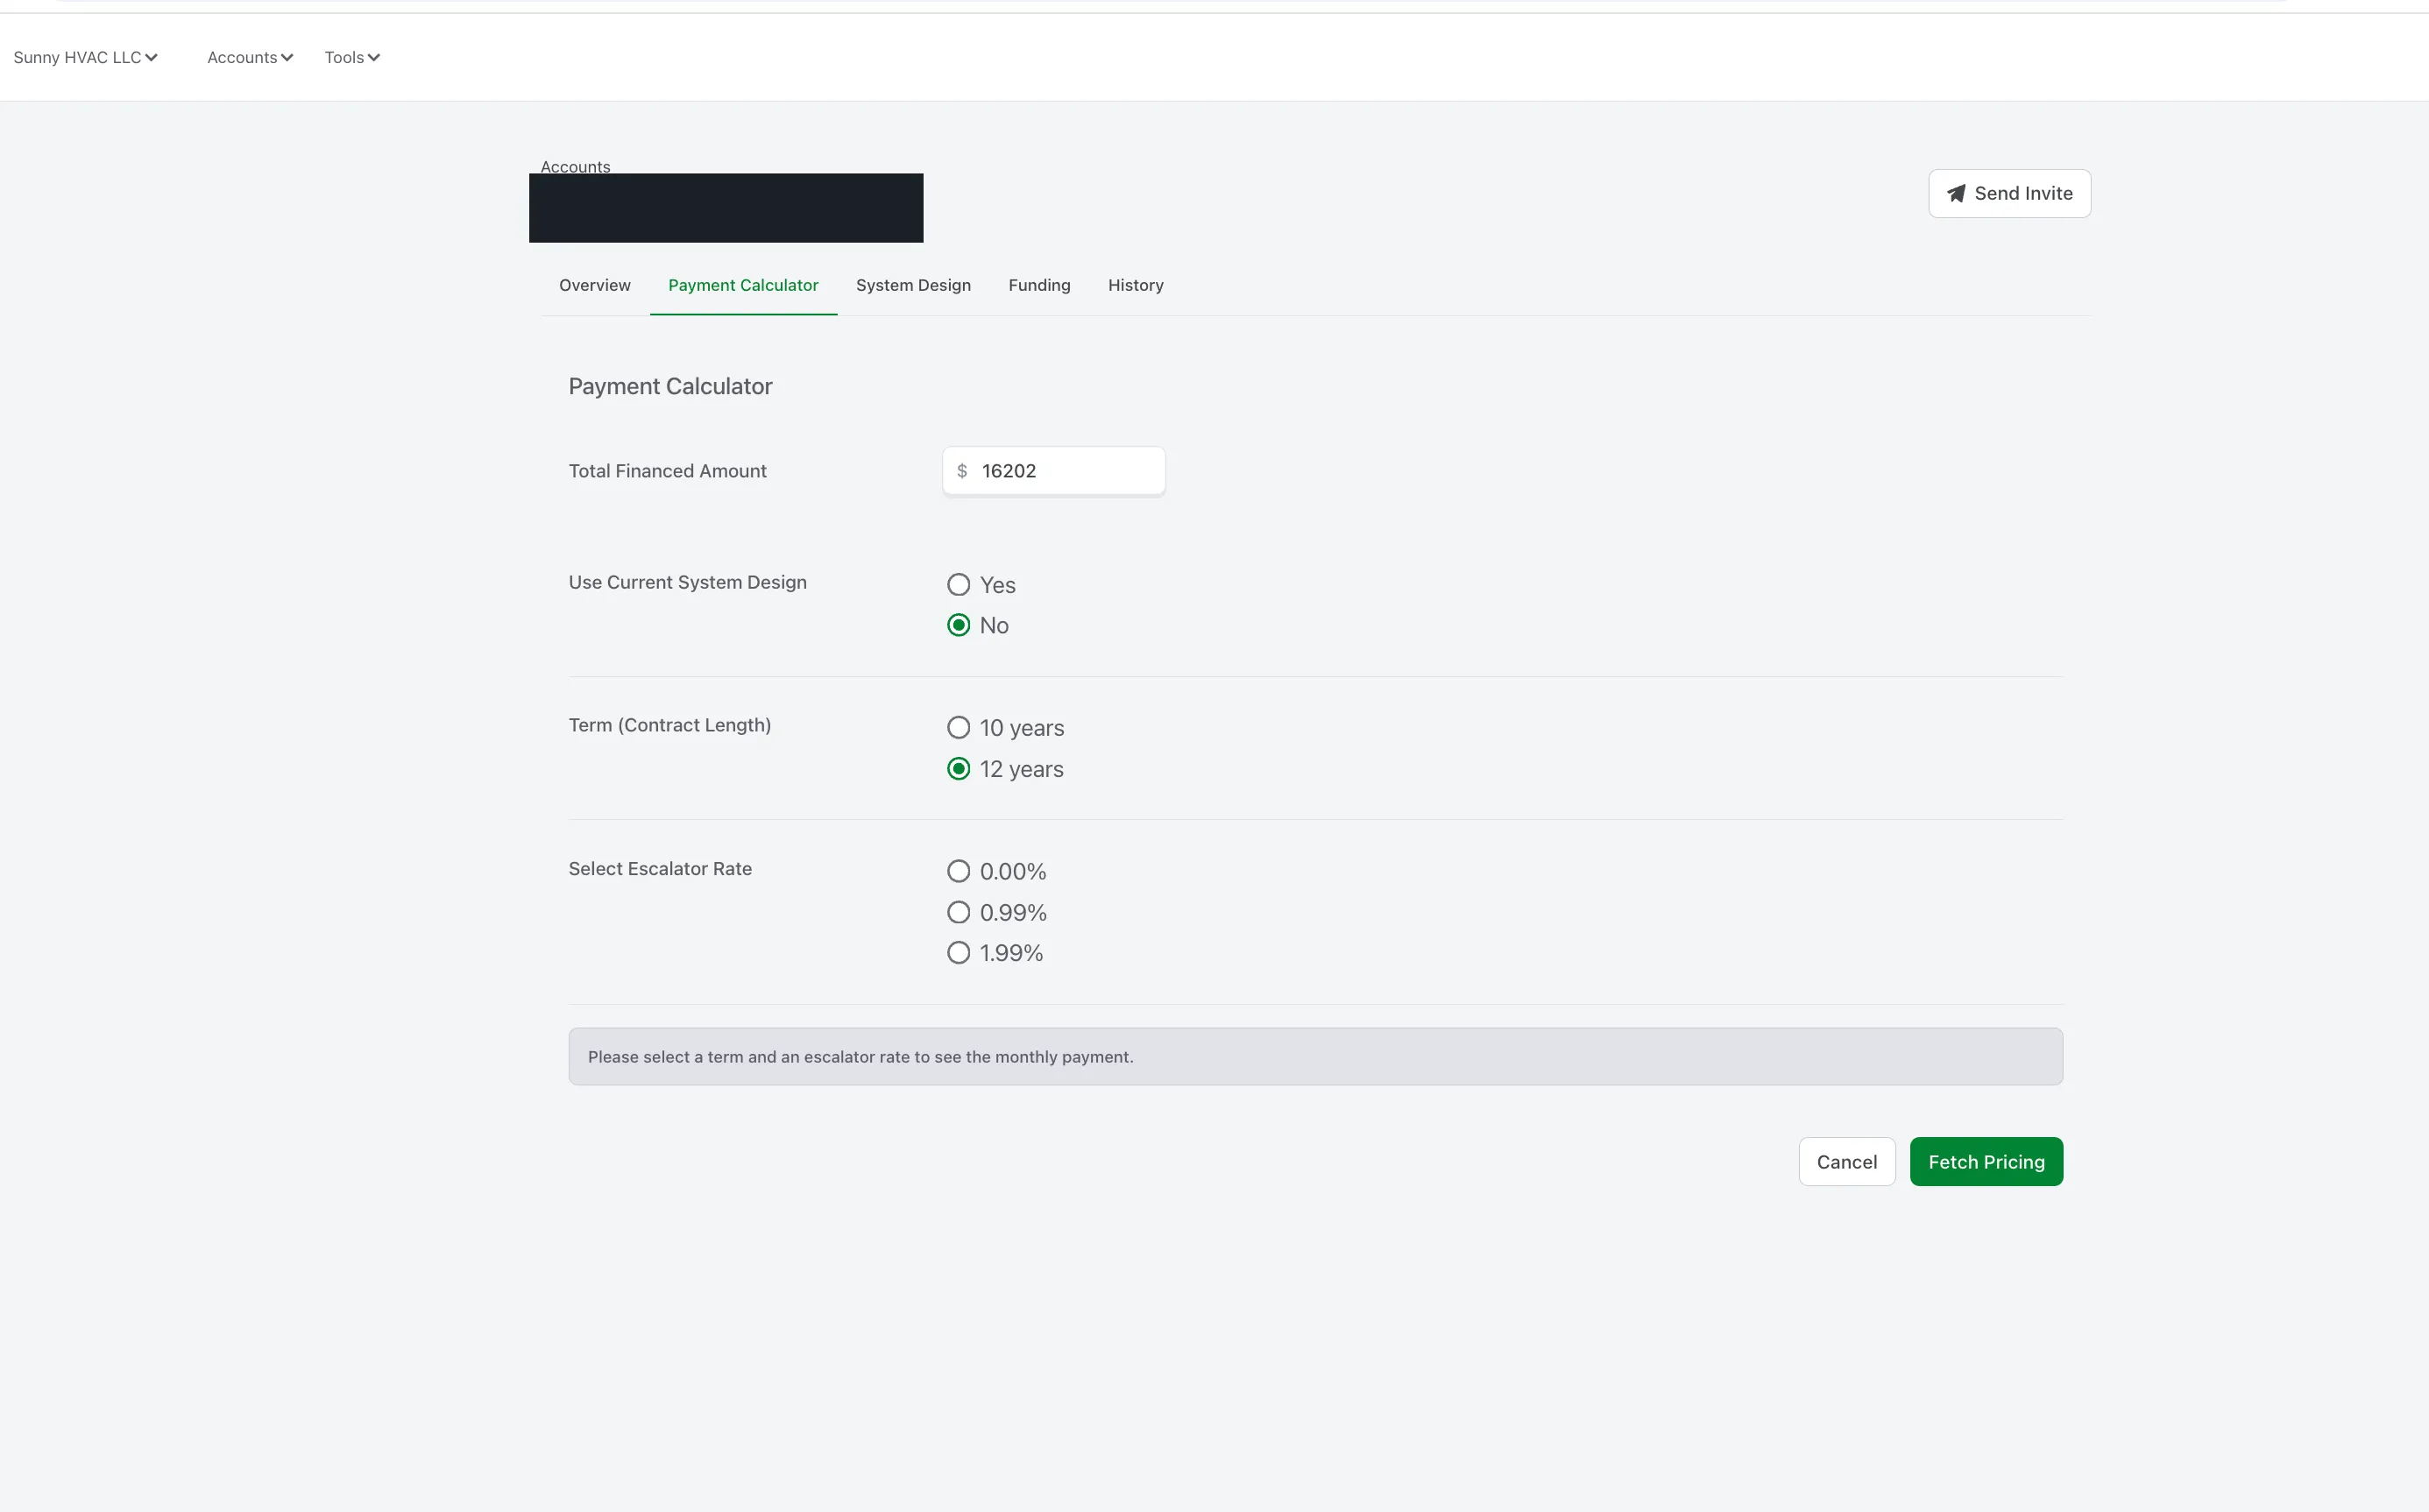
Walk the homeowner through the trade-off:
| Choice | What it does |
|---|---|
| 10 years + 0% escalator | Highest monthly, fixed forever |
| 12 years + 1.99% escalator | Lowest starting monthly, but it goes up over time |
| Anything in between | Mix and match to land on a monthly the homeowner is happy with |
Hit Fetch Pricing (or Create Quote depending on entry point). Palmetto returns the actual monthly.
9. Send the contract
Section titled “9. Send the contract”After Create Quote, Palmetto generates the contract and asks if you want to send it.
- Click Send
- The homeowner gets an email titled “Activate your financing account with Palmetto”
That email kicks off their side of the work. Until the homeowner finishes their checklist, Notice to Proceed stays open.
10. The homeowner side — what they’ll see
Section titled “10. The homeowner side — what they’ll see”The activation email opens a checklist for the homeowner. There are three items:
a. Sign Contract
Section titled “a. Sign Contract”Click Sign Contract → redirects to DocuSign → they sign. The item turns green.
b. Add Payment Method
Section titled “b. Add Payment Method”Asks: checking or savings? Then bank info.
c. Clear Facts Disclosure
Section titled “c. Clear Facts Disclosure”A short list of checkboxes confirming the rep explained:
- The monthly payment amount and term length
- What happens at the end of the lease
- (a few similar plain-language acknowledgements)
Once all three checklist items are green, Notice to Proceed flips to approved on your portal.
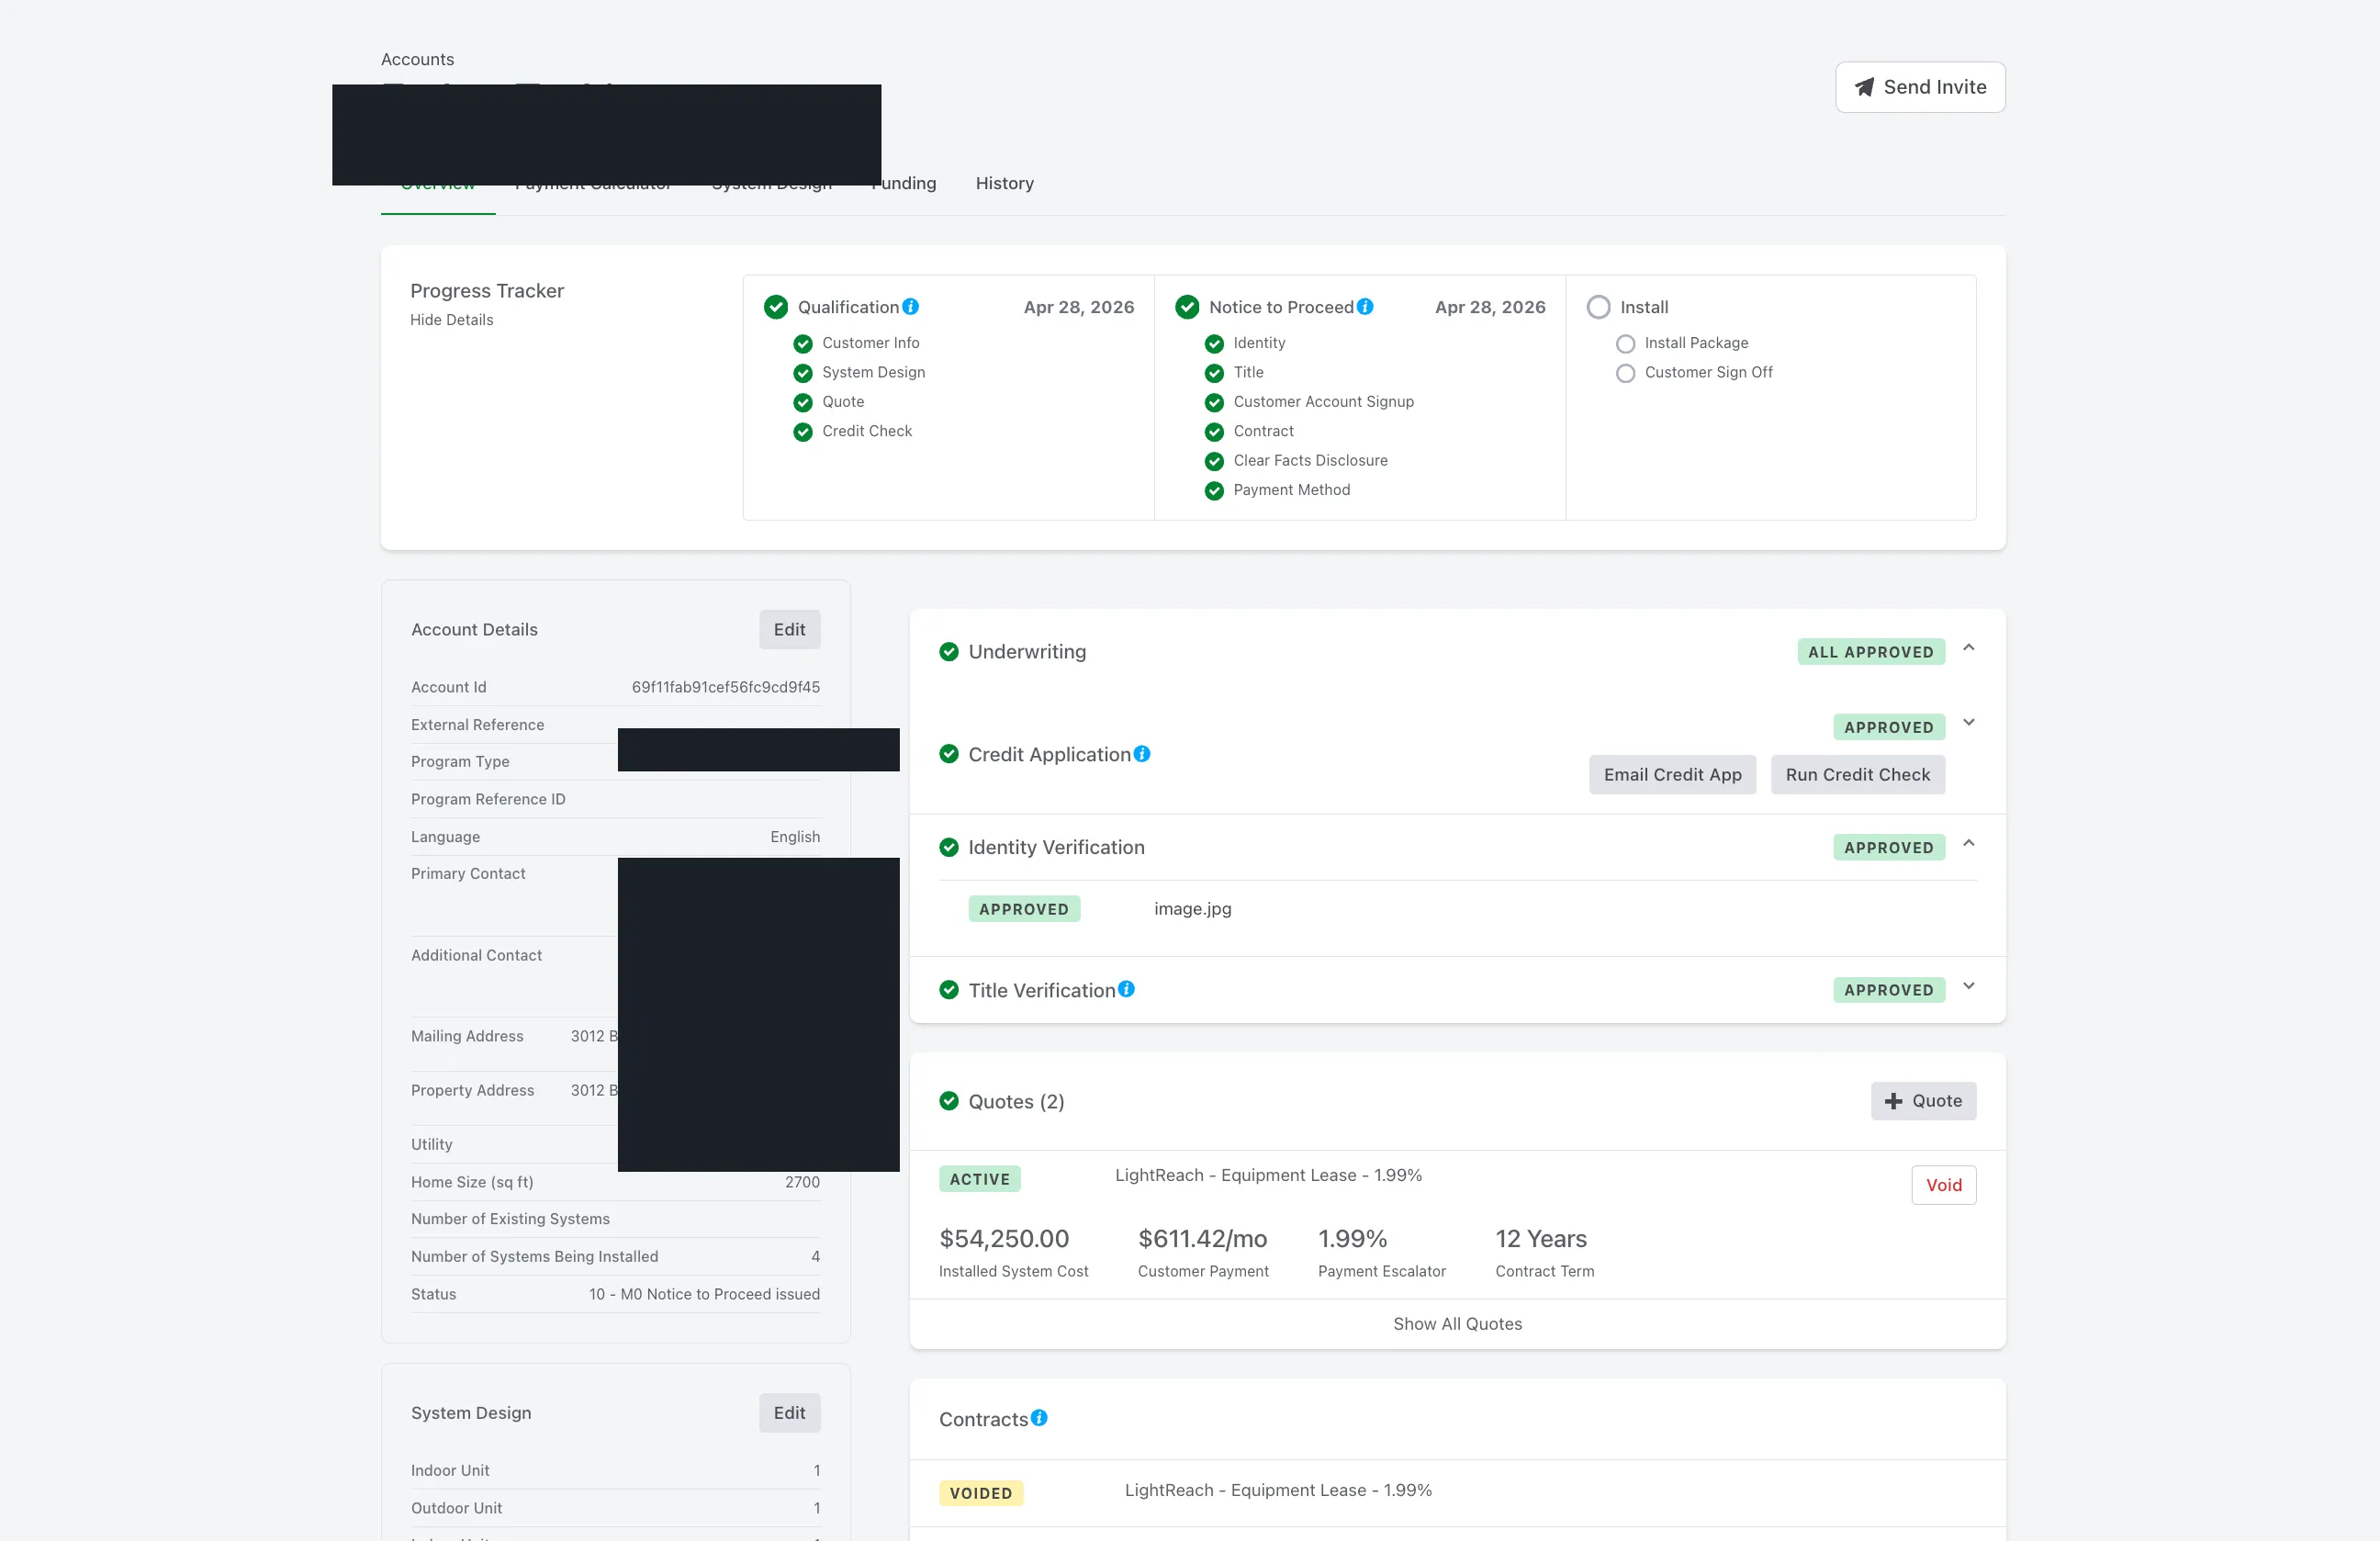
11. What “done” looks like
Section titled “11. What “done” looks like”When everything is signed and verified, the Account Overview looks like this:
12. Don’t forget the Sunny installer agreement
Section titled “12. Don’t forget the Sunny installer agreement”The Palmetto contract is only the financing piece. The homeowner still has to sign Sunny HVAC’s installer agreement separately. Both are required before install.
Common mistakes — read before your first deal
Section titled “Common mistakes — read before your first deal”Pricing math on System Design. The #1 mistake. Build every system with rough per-system equipment costs that pencil to your total project cost. Then add the rebate as a Discount so the Total Financed Amount at the bottom matches what the homeowner is actually borrowing.
Counting indoor heads instead of condensers. “Number of Systems Being Installed” = condensers. Three condensers across three floors = 3. One multi-zone condenser feeding six heads = 1.
Forgetting the Clean Heat rebate as a Discount. Without it, the financed amount is the pre-rebate total, the monthly is wrong, and you’ll have to redo pricing live in the home.
Pitching escalator backward. Higher escalator = LOWER starting monthly. Counter-intuitive, easy to garble. Practice the line: “0% means your payment never changes; 1.99% means it starts low and creeps up over the term.”
Title verification fails because the applicant isn’t on the deed. Add a co-applicant who IS on the deed (best fix), or upload proof of title (deed, deed of trust, recent property tax bill).
Trying to use a credit card for the payment method. Palmetto is ACH-only. Set the expectation early so the homeowner has bank account info ready.
After install — ops takes over
Section titled “After install — ops takes over”Everything on this page is the rep-side workflow: filling out the homeowner’s account in the home and getting the contract signed. Once the install crew finishes the job, ops submits the install package back to Palmetto so the deal can fund.
Reps don’t normally touch this side of the workflow, but it’s worth reading once so you know what ops needs from you (clean photos in the install Drive folder, accurate System Design from the home).
Getting a Palmetto login
Section titled “Getting a Palmetto login”If you don’t have a Palmetto account yet, text Jonathan and he’ll create one for you. Same for any reset / access issues. Mid-deal in a home and stuck on a screen? Jonathan is a phone call away.